For about one and a half year this blog has really only been filled with Star Wars related stuff. I bet you guys thought I had abandoned everything else. However, as I can show today, that is not the truth, at least not yet.
I think it was back in May when a friend of mine gave me a small black box and told me to build and paint the model contained within. To my surprise it was a Forge World model of the Warhammer 40k Primarch Konrad Curze. My only response then was 'when the hell am I going to find time to paint this?' Well that time has actually arrived and here is the finished result! This is by a large margin the most detailed model I've ever painted and hopefully the result brings it out. As always, enjoy!
Monday, 31 August 2015
Monday, 24 August 2015
Painting Hot Rod Zeds
Now that the scum ships are done I can finally concentrate on the paint tutorials for them. This time I'm going to reveal how I painted the Hot Rod Zeds. Just like the Scyks, the methodology was quite similar for all of them so here's one big ass tutorial for the lot of them. Since I'm a lazy bastard I'm going to use the same layout as the Scyk tutorial and also use some of the same text again. Recycling is good for the environment or so I've heard.
To make the flames stand out as much as possible I airbrushed the model with white primer. I then airbrushed the nose of the ship with Army Painter Daemonic Yellow. Next I masked off the front and painted the rest of the ship with a 1:3 mix of VGC Bloody Red and VGC Gory Red.
After removing the masking tape I painted the red mix in a reverse flame pattern. This is a much easier method than first painting the red colour and then painting the yellow flames as yellow colours generally a true PITA to paint.
Before spraying varnish on the model I also painted the engine exhausts and cockpit frame with a 1:1 mix of VMC German Grey and VGC Cold Grey. With the base colours in place I used gloss varnish to protect the model and prepare for the shading step. The shade was a dark brown oil paint (Vandyke Brown), which I carefully painted into all recesses and panel lines. When dry I used some cotton swabs, dipped in white spirit, to clean up any excess wash. This was then left to dry a full day before I sprayed the model with matte varnish to seal the oil paint.
The fuselage was highlighted with the following colours:
With the highlighting done, all that remained was the engine exhausts and cockpit. These I carefully highlight using Cold Grey, while also gradually mixing in VGC Stonewall Grey. For the final highlight I used pure white.
The cockpit canopy was painted with German Grey with a small amount of Gory Red mixed in. To achieve the reflection I added small amounts of Bloody Red to the German Grey mix until I had pure Bloody Red.
To get the engine glow I started by applying thin glazes of Gory Red which I mixed with small amounts White until I had a nice pinkish glow. For the middle of the engines, I used even more White mixed into the Gory Red, until it was almost white. Unfortunately, due to the narrow and deep exhausts, the brightest glow is barely visible.
With the details done I could seal the model completely, first with a coat of satin varnish followed by another coat using matte varnish. To finish the model I painted some gloss varnish on the cockpit canopy to give it a nice shine.
Basecoats
Fuselage highlights
Basecoats
Fuselage highlights
Basecoats
Fuselage highlights
Red Zed
After removing the masking tape I painted the red mix in a reverse flame pattern. This is a much easier method than first painting the red colour and then painting the yellow flames as yellow colours generally a true PITA to paint.
Before spraying varnish on the model I also painted the engine exhausts and cockpit frame with a 1:1 mix of VMC German Grey and VGC Cold Grey. With the base colours in place I used gloss varnish to protect the model and prepare for the shading step. The shade was a dark brown oil paint (Vandyke Brown), which I carefully painted into all recesses and panel lines. When dry I used some cotton swabs, dipped in white spirit, to clean up any excess wash. This was then left to dry a full day before I sprayed the model with matte varnish to seal the oil paint.
The fuselage was highlighted with the following colours:
- Pure Bloody Red.
- 1:1 mix of Bloody Red and VGC Dwarf skin.
- 1:1:1 mix of Bloody Red, Dwarf skin and white.
- 1:1:4 mix of the previous step.
- 3:1 Daemonic Yellow and white.
- 1:1 mix of the previous step.
- Pure white.
With the highlighting done, all that remained was the engine exhausts and cockpit. These I carefully highlight using Cold Grey, while also gradually mixing in VGC Stonewall Grey. For the final highlight I used pure white.
The cockpit canopy was painted with German Grey with a small amount of Gory Red mixed in. To achieve the reflection I added small amounts of Bloody Red to the German Grey mix until I had pure Bloody Red.
To get the engine glow I started by applying thin glazes of Gory Red which I mixed with small amounts White until I had a nice pinkish glow. For the middle of the engines, I used even more White mixed into the Gory Red, until it was almost white. Unfortunately, due to the narrow and deep exhausts, the brightest glow is barely visible.
With the details done I could seal the model completely, first with a coat of satin varnish followed by another coat using matte varnish. To finish the model I painted some gloss varnish on the cockpit canopy to give it a nice shine.
Black and green Zed
Basecoats
- White Primer.
- VGC Fluo Green front.
- 1:1 mix of German Grey and Black.
- Reverse flame pattern using the same mix as the previous step.
Fuselage highlights
- 3:1 mix of German Grey and Black.
- 2:1 mix of German Grey and Cold Grey.
- 1:3 mix of the second step.
- 1:2 mix of Stonewall Grey and Cold Grey.
- 1:1:1 mix of Daemonic Yellow, Fluo Green, and White.
- 1:1:3 mix of the first step.
- 1:1:5 mix of the first step.
- Exhausts and canopy frame - Same as for the Red Zed.
- Canopy - German Grey with a little Sick green mixed in. Fluo Green was used to create the reflection.
- Engine glow - Same as for the Red Zed.
Purple Zed
Basecoats
- White Primer
- Fade effect using White first, Daemonic Yellow second, 1:2 mix of VCG Hot Orange and Daemonic Yellow third and pure Hot Orange as the last layer.
- Pure (Old range) GW Liche Purple.
- Reverse flame pattern using the same mix as the previous step.
Fuselage highlights
- 5:1 mix of Liche Purple and White.
- 2:1 mix of the first step.
- 1:2 mix of the first step.
- 1:5 mix of the first step.
- Starting from the front, pure White.
- 1:2 mix of White and Daemonic Yellow.
- Pure Daemonic Yellow.
- 1:2 mix of Hot Orange and Daemonic Yellow.
- Exhausts and canopy frame - Same as for the Red Zed
- Canopy - German Grey with a Liche Purple mixed in. The fuselage highlight colours and were used to create the reflection.
- Engine glow - Same as for the Red Zed.
Blue Zed
Basecoats
- White Primer
- Fade effect using Daemonic Yellow first, 1:2 mix of Hot Orange and Daemonic Yellow Second, pure Hot Orange third and a 1:1 mix of Bloody Red and Hot Orange as the last layer.
- 1:1 mix of VGC Magic Blue and VGC Falcon Turquoise.
- Reverse flame pattern using the same mix as the previous step.
Fuselage highlights
- 1:1:1 mix of Magic Blue, Falcon Turquoise and White
- 1:1:2 mix of the first step.
- 1:1:4 mix of the first step.
- 1:1:8 mix of the first step.
- Pure White
- Starting from the front, 1:2 mix of White and Daemonic Yellow.
- Pure Daemonic Yellow.
- 1:2 mix of Hot Orange and Daemonic Yellow.
- Pure Hot Orange
- Exhausts and canopy frame - Same as for the Red Zed
- Canopy - German Grey with a Falcon Turquoise mixed in. The fuselage highlight colours and were used to create the reflection.
- Engine glow - Same as for the Red Zed.
Monday, 17 August 2015
Commission: Phoenix HWK
And here's the final ship! Just like the previous HWK this has been inspired by another mythological bird, a phoenix in this particular case. And with that I can finally close the lid on this commission. 17 ships, which took 45 days to complete. That's a little over two and half days for each ship. Anyway, the last picture shows all 17 ships together. Enjoy!
Etiketter:
Commission,
Completed,
Star Wars: X-wing
Sunday, 16 August 2015
Commission: Thunderbird HWK
It's certainly taken a while but the final two scum ships are finally finished. First up is a HWK inspired by thunderbirds (the mythological creature, not the car). This has probably been the most difficult paintjob I've ever attempted and I've had to repaint parts of it several times before I was satisfied.
Etiketter:
Commission,
Completed,
Star Wars: X-wing
Sunday, 9 August 2015
Commission: Black and green Starviper
Here's the third and final butterfly Starviper. Like the previous Starviper, I do not know the species of butterfly but it's a beauty. It also marks the first time I've tried the marvellous substance known as liquid mask. Without it, this model would have been a lot harder to paint, and probably would have looked quite differently.
Edit 2021: The link to the butterfly image has been lost which necessitated a removal.
Etiketter:
Commission,
Completed,
Star Wars: X-wing
Saturday, 8 August 2015
Commission: Rainbow butterfly Starviper
This Starviper was inspired by a very colourful butterfly that seem to include just about every colour in the rainbow, hence the name I've given it. I have included a picture of below. Now this one was difficult to paint as I constantly struggled to mix the proper colour. Not something I want to do again but the end result is very good looking.
Edit 2021: The link to the butterfly image has been lost which necessitated a removal.
Etiketter:
Commission,
Completed,
Star Wars: X-wing
Friday, 7 August 2015
Commission: Death Head Starviper
This is the first of a set of three Starvipers to be painted as butterflies. Or rather a moth in this particular case. The infamous Death Head moth served as the inspiration for this Starviper, though I took some freedoms with the colours to make the model more interesting.

Etiketter:
Commission,
Completed,
Star Wars: X-wing
Thursday, 6 August 2015
Commission: Red and yellow Hot Rod Zed
It has taken a few days longer than expected but here is the final Hot Rod Zed. This was originally supposed to be painted as N'dru Suhlak but the commissioner changed his mind before I could do more than prime the model. I'm kind of glad he did, as this was a rare opportunity to paint both bright red and bright yellow. Enjoy!
Etiketter:
Commission,
Completed,
Star Wars: X-wing
Saturday, 1 August 2015
Painting Elemental Scyks
With the current commission still taking up most of my time I haven't exactly had time to do any paint guides. Let's try to do something about that, shall we? Here's how I painted the elemental Scyks. This primarily shows how I painted the water Scyk, though the methodology was mostly the same for all the ships. So first I'll go through the water Scyk, then I will post the paints used for the rest of the ships. Hold on to your hats, this is going to be a long post.
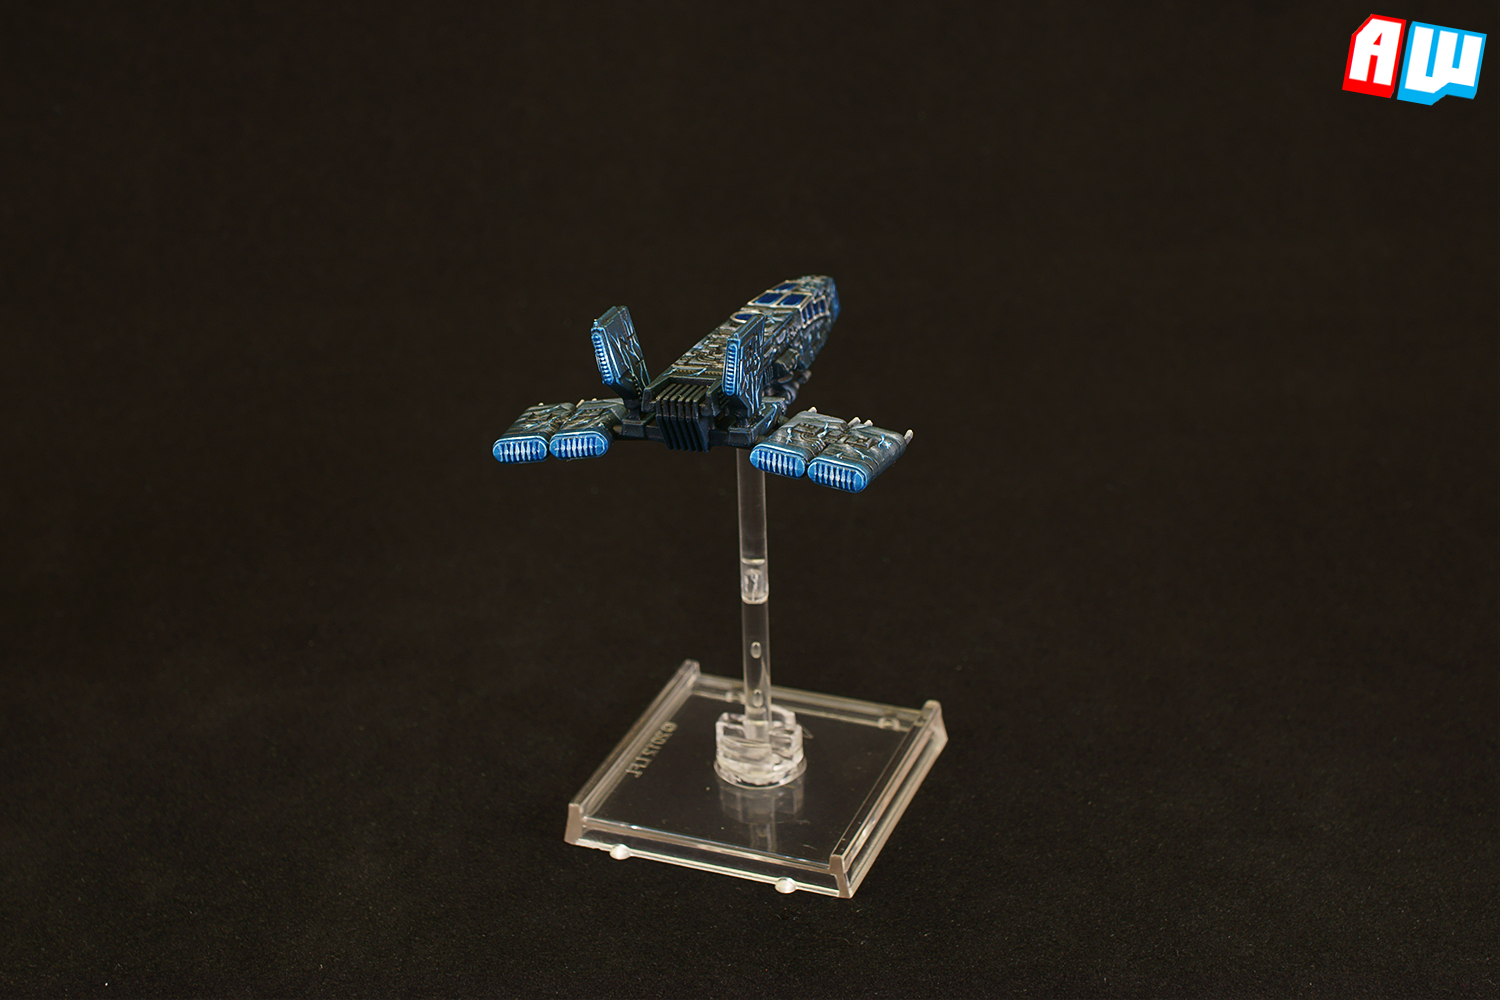
The first step was the all important fade effect. This had to be carefully airbrushed to get the smoothest transition possible. I started with the front and worked towards the back.
With the base colours in place I used gloss varnish to protect the model and prepare for the shading step. The shade was a 1:1 mix of black and dark brown oil paints, which I carefully painted into all recesses and panel lines. When dry I used some cotton swabs, dipped in white spirit, to clean up any excess wash. This was then left to dry a full day before I sprayed the model with matte varnish to seal the oil paint.
For the highlight I reversed the work order, going from the back towards the front instead. As you'll notice, some of these mixes are the same as some used to achieve the fade.
Finally I could add the details. The lasers beside the cockpit was first given a dot of VGC Gory Red, followed by an even smaller dot of VGC Bloody Red.
The cockpit canopy was painted with VMC German Grey with a small amount of Ultra Marine Blue mixed in. To achieve the reflection I added small amounts of Ultra Marine Blue, Falcon Turquoise and Wolf Grey to the German Grey mix until I had pure Wolf Grey. When this was done I could finally highlight cockpit frame which used the same mixes and steps as the previous highlights.
To get the engine glow I started by applying many thin glazes of Army Painter Red Tone ink around the engines. When I was satisfied I had a good start, I switched to thin glazes of Gory Red which I mixed with small amounts White until I had a nice pinkish glow. For the middle of the engines, I used even more White mixed into the Gory Red, until it was almost white.
With the details done I could seal the model completely, first with a coat of satin varnish followed by another coat using matte varnish. To finish the model I painted some gloss varnish on the cockpit canopy to give it a nice shine.
Fade effect
Highlights
Fade effect
The front was painted with a 1:1 mix of German Grey and Black. I wasn't satisfied with the fade so I painted several thin glazes using Red Tone ink on the 'fins' to improve the red colour.
Shade - Same as for the Water Scyk.
Highlights
Water Scyk
The first step was the all important fade effect. This had to be carefully airbrushed to get the smoothest transition possible. I started with the front and worked towards the back.
- 2:1:1 mix of VGC Wolf Grey, VGC Falcon Turquoise and VGC Ultra Marine Blue.
- 3:2:2 mix of the first step.
- 1:1:1 mix of the first step.
- 1:2:2 mix of the first step.
- 1:1 mix of Falcon Turquoise and Ultra Marine Blue.
With the base colours in place I used gloss varnish to protect the model and prepare for the shading step. The shade was a 1:1 mix of black and dark brown oil paints, which I carefully painted into all recesses and panel lines. When dry I used some cotton swabs, dipped in white spirit, to clean up any excess wash. This was then left to dry a full day before I sprayed the model with matte varnish to seal the oil paint.
For the highlight I reversed the work order, going from the back towards the front instead. As you'll notice, some of these mixes are the same as some used to achieve the fade.
- 1:1:1 mix of VGC Wolf Grey, VGC Falcon Turquoise and VGC Ultra Marine Blue. This was also used on the front.
- 2:1:1 mix of the first step. This was also used to highlight the front.
- 4:1:1 mix of the first step. This was also used to highlight the front.
- Pure Wolf Grey, though this step was not used on the front.
Finally I could add the details. The lasers beside the cockpit was first given a dot of VGC Gory Red, followed by an even smaller dot of VGC Bloody Red.
The cockpit canopy was painted with VMC German Grey with a small amount of Ultra Marine Blue mixed in. To achieve the reflection I added small amounts of Ultra Marine Blue, Falcon Turquoise and Wolf Grey to the German Grey mix until I had pure Wolf Grey. When this was done I could finally highlight cockpit frame which used the same mixes and steps as the previous highlights.
To get the engine glow I started by applying many thin glazes of Army Painter Red Tone ink around the engines. When I was satisfied I had a good start, I switched to thin glazes of Gory Red which I mixed with small amounts White until I had a nice pinkish glow. For the middle of the engines, I used even more White mixed into the Gory Red, until it was almost white.
With the details done I could seal the model completely, first with a coat of satin varnish followed by another coat using matte varnish. To finish the model I painted some gloss varnish on the cockpit canopy to give it a nice shine.
Earth Scyk
- 1:1 mix of VGC Escorpena Green and VGC Sick Green.
- 1:2 of the first step.
- Pure Sick Green.
- 1:4 mix of VGC Cayman Green and Sick Green.
- 1:2 mix of the fourth step.
- 1:1 mix of the fourth step. This was also used as the basecoat on the front.
- Pure Sick Green. This was also used to highlight the front.
- 1:1 mix of Escorpena Green and Sick Green. This was also used to highlight the front.
- Pure Escorpena Green. This was also used to highlight the front.
- 2:1 mix of Escorpena Green and White. Not used on the front.
- 1:2 mix of the fourth step. Not used on the front.
- Lasers - Same as for the Water Scyk.
- Canopy - German Grey with a little Sick green mixed in. The highlight steps were used to paint the reflection.
- Engine glow - Same as for the Water Scyk
Air Scyk
Fade effect
- 1:4 mix of VGC Shadow Grey and VGC Stonewall Grey.
- 2:3 mix of the first step.
- 2:2 mix of the first step.
- 2:1 mix of the first step.
- 4:1 mix Shadow Grey and German Grey.
- 3:1 mix of the fifth step.
- 2:1 mix of the fifth step. This was also used as the basecoat on the front.
Highlights
- Pure Shadow Grey.
- 2:1 mix of Shadow Grey and Stonewall Grey .
- 1:1 mix of the second step. This was also used to highlight the front.
- 1:2 mix of the second step. This was also used to highlight the front.
- 1:4 mix of the second step. Not used on the front.
- Pure Stonewall Grey. This was also used to highlight the front.
- 1:1 mix of Stonewall Grey and White. Not used on the front.
- Lasers - Same as for the Water Scyk
- Canopy - German Grey with a little Shadow Grey mixed in. The highlight steps were used to paint the reflection.
- Engine glow - Same method as the Water and Earth Scyk but VMC Fluo Blue replacing the Gory Red.
Fire Scyk
Fade effect
- 2:1 mix of VGC Plague Brown and VGC Hot Orange.
- 1:1 mix of the first step.
- 1:2 mix of the first step.
- Pure Hot Orange.
- 2:1 mix of Hot Orange and Bloody Red.
- 1:1 mix of the fifth step.
- Pure Bloody Red.
The front was painted with a 1:1 mix of German Grey and Black. I wasn't satisfied with the fade so I painted several thin glazes using Red Tone ink on the 'fins' to improve the red colour.
Shade - Same as for the Water Scyk.
Highlights
- 1:2 mix of VGC Plague Brown and VGC Hot Orange.
- 1:1 mix of the first step.
- 2:1 mix of the first step.
- 2:2:1 mix of Plague Brown, Hot Orange, and White.
- 2:2:2:1 mix Plague Brown, Hot Orange, White and Army Painter Daemonic Yellow.
- 1:2 mix of German Grey and VGC Cold Grey.
- Thin wash using Army Painter Dark Tone ink as the first highlight proved too bright
- 1:3 mix of the first step.
- Pure Cold Grey.
- Pure Stonewall Grey.
- Lasers - Same as for the Water Scyk.
- Canopy - German Grey with a little Gory Red mixed in. For the reflection, Bloody Red and Hot Orange was added to the mix until the reflection was bright enough.
- Engine glow - Same method as the Water and Earth Scyk but VMC Fluo Blue replacing the Gory Red.
Subscribe to:
Comments (Atom)