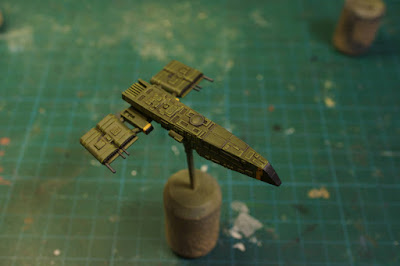
The Draken started out as a fairly straightforward project, all I really wanted was to paint something quick and easy that could be used both for scum and rebels. However, it quickly took on a life of its own. I had no plans to be inspired by Swedish military jets to begin with but somehow that's what I ended up with. My mind take strange turns sometimes.
Before painting I had to some conversions, a process that also took on a life of its own. I ended up removing quite a lot of small details, adding some plasticard and, because I broke some of them, replaced/cut off a few of the wing antennas.
After starting with a few layers of Vallejo's Grey primer I then airbrushed the yellow details using VGC Plague Brown. To protect the yellow I applied some liquid mask on top. As you can see above I also painted the base colour (VGC Cayman Green) around each yellow area.
The reason for doing this is that when using liquid mask it's easy to mask off a bit too much. By painting the colour around the area to be masked, any excess masking isn't noticable when the mask is later removed.
With the liquid mask in place I airbrushed the rest of the ship with Cayman Green. After removing the mask I painted the window frames, gun barrels and wing antennas with a 1:3 mix of VGC Cold Grey and VMC German Grey. The nose and all engine intakes were instead painted with a 1:1 mix of German Grey and Black.
The model was then airbrushed with gloss varnish to prepare for the shading step. For the shade I made a wash using a dark brown oil paint and applied in all recesses. When dry, I removed the excess with some white spirits and cotton swabs. After leaving the oil wash to properly dry for an entire day I sealed it with a layer of matte varnish.
The first highlight was a 1:1 mix of Cayman Green and VGC Camo Green, while the second was a 1:4 mix of the previous colours. The third and final layer was a 4:1 mix of VGC Dead Flesh and Camo Green. I tried to keep the highlights more muted than I normally do, therefore I didn't bother with a fourth or fifth highlight.
I painted the windows with German Grey and I also used the same colour to highlight the nose and the engine intakes. The yellow markings was highlighted with a 3:1 mix of Plague Brown and White. I also highlighted the wing antennas and the window frames with a 1:1 mix of German Grey a
The windows was painted with German Grey before I highlighted the engine intakes and window reflections using the following colours:
- 3:1 mix of German Grey and Cold Grey.
- 2:3 mix of the same colours as the first step.
- Pure Cold Grey.
- 1:3 White and Plague Brown.
- 1:1 mix of the same colours as the first step.
- 3:1 mix of first step.
I wanted to try an orange engine glow on this ship so I started by painting thin layers of VMC Orange Fluo around the engine. To help the painting process I added some Vallejo Glaze Medium to the mix. After some layers I added some VGC Hot Orange to the Orange Fluo and continued painting thin layers.
Unfortunately I made the mistake of mixing in AP Daemonic Yellow for the final stages and the middle of the engines. Why, oh why didn't I use Plague Brown instead? The difficulty of painting yellow is well known but somehow I though it would work here. Silly me.
To finish the model I did my usual 'scratch and dent' routine. I also added several dirt and oil streaks all over the model. I didn't add any rust though, as I feared it would clash with the engine glow.


No comments:
Post a Comment