 And here's my little tutorial on how I converted a TIE Bomber to a Shuttle. While the TIE Shuttle may seem like a simple conversion there is actually more going on under the hood than what is at first visible.
Showing posts with label tutorial. Show all posts
Showing posts with label tutorial. Show all posts
Wednesday, 3 August 2016
Building a TIE Shuttle
And here's my little tutorial on how I converted a TIE Bomber to a Shuttle. While the TIE Shuttle may seem like a simple conversion there is actually more going on under the hood than what is at first visible.Friday, 5 February 2016
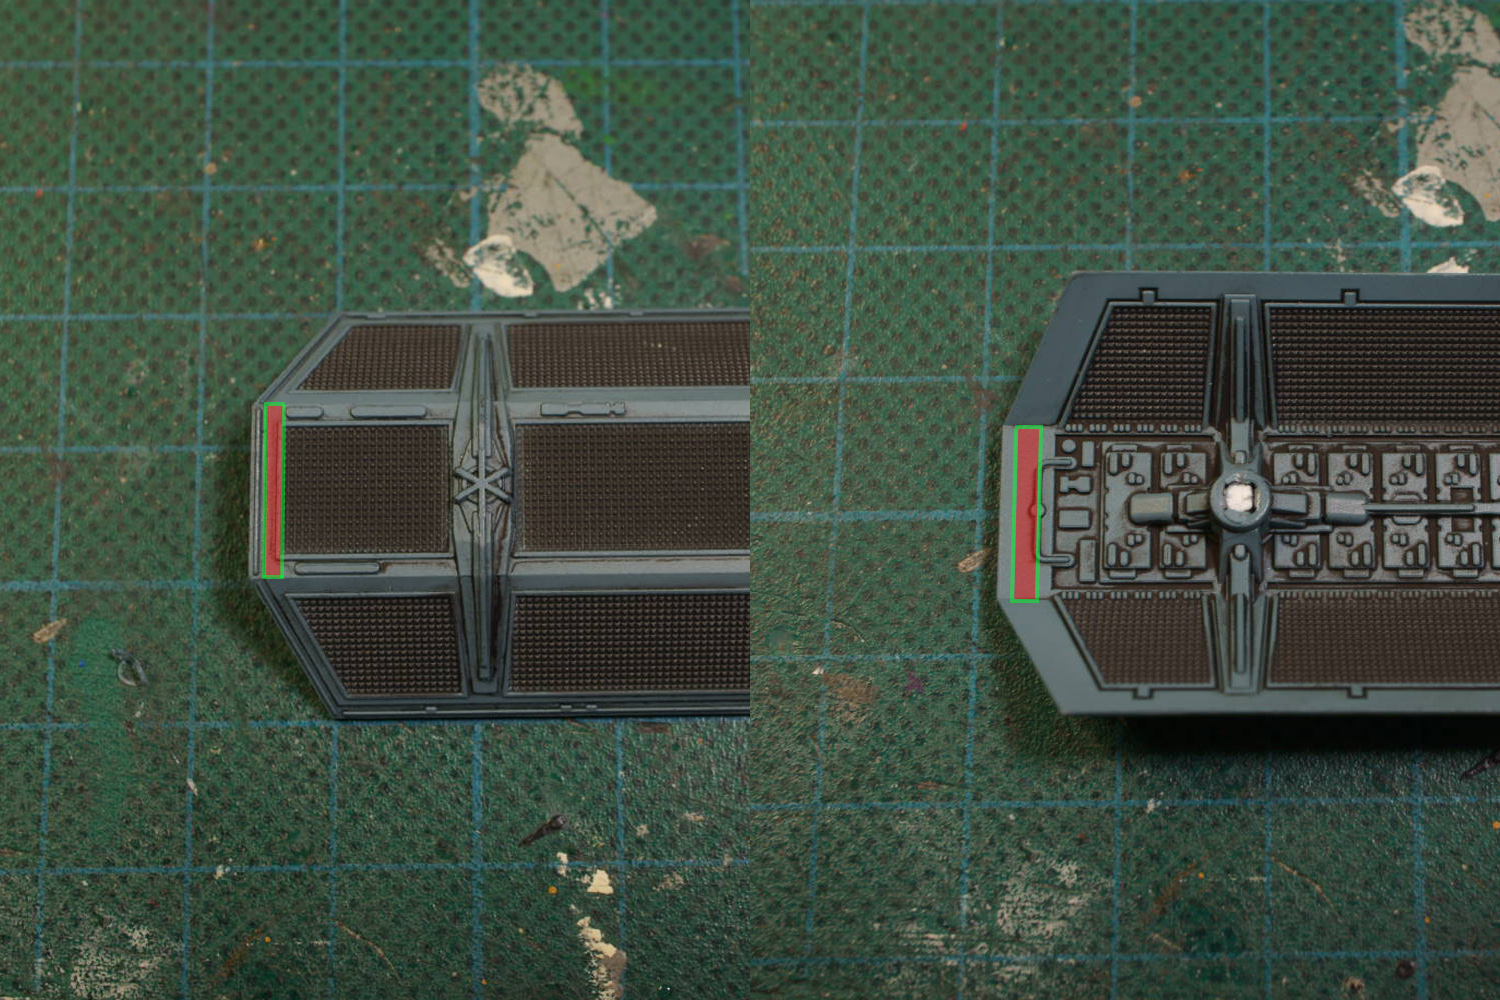
Tutorial: TIE Punisher solar panel mod
I figured I should do a quick tutorial on how I modded my TIE Punisher. Now I'm obviously biased but I really think all Punishers should be improved in this way as it really helps distinguish its side profile from the TIE Bomber.

First you need to remove the details marked in red. After that it's a rather simple matter of cutting away a rectangular piece from the front/middle of each solar panel. The green lines show roughly where I cut. Now, do NOT throw away this piece, it will be needed later.

When the cuts has been made, the loose piece needs to be trimmed down. All we really want left is the middle of the piece.
 With the excess removed it's a simple thing to glue the remaining piece back into the previously created cavity. Some modelling putty is needed to fill in any holes and correct any flaws. Voilà, quick and simple Punisher improvement.

First you need to remove the details marked in red. After that it's a rather simple matter of cutting away a rectangular piece from the front/middle of each solar panel. The green lines show roughly where I cut. Now, do NOT throw away this piece, it will be needed later.
When the cuts has been made, the loose piece needs to be trimmed down. All we really want left is the middle of the piece.

Monday, 28 September 2015
Tutorial: Painting Y-wing astromechs
After getting quite a lot of comments about how I paint astromechs I figured it was time to teach the world how I do it. It's not that difficult! Now you'll have to excuse my poor excuses for pictures but I'm not an Photoshop expert that can turn a picture of a pizza into a super model. They are really only here to provide a basic idea.

The shape of the droids found on the Y-wing model leads me to believe it is meant to represent either an R5 or R6 astromech droid. In this example I have chosen to paint it as an R5.

The first step is to paint a few layers of a bright grey and cover the entire mech with an even coat. I usually go for a 1:2 mix of White and VGC Stonewall Grey. It looks white enough and still makes it possible to highlight further. Of course in the picture above I've represented the basecoat with a darker grey to help visualise the effect. It's also the reason why I've used a blue background.

Next the mech needs to be shaded. I simply apply a wash using AP Dark Tone ink in the recesses around the shoulders/legs and around the base of the mech (represented above with some poorly painted dark areas). When the wash is dry, the basecoat is reapplied to clean up the mech, leaving the wash only visible in the recesses. Also of importance is a thin band of wash painted around the 'neck' of the mech.

To highlight the droid, I simply use White to highlight all edges. I also paint another thin band around the neck, using White this time and taking great care to not cover the previous, dark band.

For details I paint a colour of my choice on top of the head and two thin stripes on the front/chest of the astromech. In the above example I have used red, but just about any colour can be used. I then paint thin lines across the head using the basecoat to create the pizza slice effect.

To finish off the droid, I paint a small stripe of a dark grey (Usually VMC German Grey) on each side of the head and also paint three small dots on the front of the head to represent the optics. When all is said and done you should have something that looks like the picture below.

And that's all there is to it! Sure it's fiddly because of the tiny size but it's not impossible by any means. I'm pretty sure that the basic ideas presented in this tutorial can also be used to paint the astromech found on other ships. Of course, nothing beats a little basic research for inspiration. Do a search for astromechs and you'll find tons of examples. I hope this helps!
Wednesday, 18 March 2015
Tutorial: Scratches, dents and blaster hits
I've recently been asked to do a quick tutorial of how I paint the laser scoring on my ships so here it is. Also included in this tutorial is how I represent small paint chips and other assorted small damages as the method is almost the same as for blaster hits.

To start with I had to have a test subject. I dug up an old shield from a plastic Gundam kit and quickly painted it, nothing fancy, just some VGC Scarlett Red base with VGC Bloody Red as highlights.

The first step when doing is marking the areas to 'damaged' with the main highlight colour, in this case Bloody Red. For small chips and scratches (The first two spots from the left) I often use a small piece of sponge or a really old drybrush that is pointing in all direction to get a suitably chaotic pattern. After the first application I usually go back and fill in some of the chips with additional paint to make them larger or cover specific areas.
For blaster hits I manually paint the entire 'damaged' area in a slightly irregular pattern. As can be seen in the picture above, the first hit is round while the other is elongated. The circular spot represent a fairly clean hit from the front, while the second one is intended to show a shot that has hit at a steep angle.

Second step is painting every bright red area with a dark grey, in this case VMC German Grey. Take care to not cover the entire previous paint with the second layer.

Third step is more of the same, only using a 'medium' grey, which is VGC Cold Grey for me. Also notice that not all the chips was painted with this colour. By leaving some chips darker, you can give the impression of both varying age and depth on the chips.

Fourth and final grey layer is a bright, almost white, grey, in this case VGC Stonewall Grey. Despite not using metallic paints, the smaller chips looks almost metallic.

The blaster hits get a further layer using a black dry pigment. While I use MIG Black Smoke, I'm fairly confident that most dry pigments would work for this purpose. Anyway, I apply this with an old brush and basically stipple it on. Any excess pigments can easily be removed using the lungs you were born with.

To finish the scorch marks I take a fine brush and slightly wet the tip, often just with my own saliva. Then I gently clean up and push the pigments that are directly on top of the blaster hit to the edge of the mark. And that's all there is to it. Quick and easy chips and damage for everyone!
To start with I had to have a test subject. I dug up an old shield from a plastic Gundam kit and quickly painted it, nothing fancy, just some VGC Scarlett Red base with VGC Bloody Red as highlights.
The first step when doing is marking the areas to 'damaged' with the main highlight colour, in this case Bloody Red. For small chips and scratches (The first two spots from the left) I often use a small piece of sponge or a really old drybrush that is pointing in all direction to get a suitably chaotic pattern. After the first application I usually go back and fill in some of the chips with additional paint to make them larger or cover specific areas.
For blaster hits I manually paint the entire 'damaged' area in a slightly irregular pattern. As can be seen in the picture above, the first hit is round while the other is elongated. The circular spot represent a fairly clean hit from the front, while the second one is intended to show a shot that has hit at a steep angle.
Second step is painting every bright red area with a dark grey, in this case VMC German Grey. Take care to not cover the entire previous paint with the second layer.
Third step is more of the same, only using a 'medium' grey, which is VGC Cold Grey for me. Also notice that not all the chips was painted with this colour. By leaving some chips darker, you can give the impression of both varying age and depth on the chips.
Fourth and final grey layer is a bright, almost white, grey, in this case VGC Stonewall Grey. Despite not using metallic paints, the smaller chips looks almost metallic.
The blaster hits get a further layer using a black dry pigment. While I use MIG Black Smoke, I'm fairly confident that most dry pigments would work for this purpose. Anyway, I apply this with an old brush and basically stipple it on. Any excess pigments can easily be removed using the lungs you were born with.
To finish the scorch marks I take a fine brush and slightly wet the tip, often just with my own saliva. Then I gently clean up and push the pigments that are directly on top of the blaster hit to the edge of the mark. And that's all there is to it. Quick and easy chips and damage for everyone!
Tuesday, 23 December 2014
Tutorial: Testors Decal paper and decals in general
Since there seems to be an interest in the decal paper I used for the Yakuza Zeds, I've decided to do a short tutorial on how I used them.
What I used was the following, Testors Decal system, more specifically, 9201 clear decal sheets. Now Testors would have you believe that you need all the stuff, add-ons and software they sell to able to utilise their decal paper, but that is nothing but a fat lie. All you need is one of their decal sheets and an inkjet printer.

Of course, getting a design onto the sheet can be a hassle as well. First of all you need to consider that the paper is 5.5 x 8.5 inch in size. This can cause some trouble for Europeans, like myself. Also, you might need to know your way around Photoshop or similar programs. Before even considering printing a design onto the actual decal sheet, try using normal paper to see if the design work, that the size is correct, the motifs are aligned properly and so on.
The above picture shows one of my first attempts, just a low quality version to see if every setting I had tried out on normal paper was correct. One thing I immediately discovered was that anything you print on to the decal paper is very easy to smudge. It can take days before the ink has dried to the point that it won't be erased by even by the lightest of touches. To prevent this I sprayed a light mist of varnish onto the sheet. DO NOT use varnish from a bottle, that will completely ruin the design.


When the decals are safe to handle it is time to cut them out from the paper. I usually try cut fairly close to the design so the transparent outline around a decal is kept to a minimum. Next the decal gets put in a bath of water. Unlike most decals I've tried, the Testors paper release its captives fairly quickly, just 10-15 seconds with the backing paper in water should be enough.

Before I apply a decal to anything I first prep the surface with some gloss varnish and right before I put the decal in place I also use a chemical called Micro Set. Micro Set does several things, it softens the decal, increases the adhesive qualities and prevents air bubbles. When the decal is in its final position I brush a bit of extra Micro Set on top, wait a few minutes and then press it down with a piece of tissue paper. This is then allowed to set 24 hours before the next stage.


To finish the decal I first brush some gloss varnish on top of it. This is then followed up by several layers of matte varnish concentrated around the edge of the decal. I do this to hide the edge, otherwise it can be visible and quite frankly ruin the look of a model. To be honest, the above picture isn't the best example of how it should look as I didn't wait for the decal to set properly. Who has time to wait 24 hours when doing a tutorial? Not me, that's for certain! Anyway I hope this will help. Enjoy!
What I used was the following, Testors Decal system, more specifically, 9201 clear decal sheets. Now Testors would have you believe that you need all the stuff, add-ons and software they sell to able to utilise their decal paper, but that is nothing but a fat lie. All you need is one of their decal sheets and an inkjet printer.
Of course, getting a design onto the sheet can be a hassle as well. First of all you need to consider that the paper is 5.5 x 8.5 inch in size. This can cause some trouble for Europeans, like myself. Also, you might need to know your way around Photoshop or similar programs. Before even considering printing a design onto the actual decal sheet, try using normal paper to see if the design work, that the size is correct, the motifs are aligned properly and so on.
The above picture shows one of my first attempts, just a low quality version to see if every setting I had tried out on normal paper was correct. One thing I immediately discovered was that anything you print on to the decal paper is very easy to smudge. It can take days before the ink has dried to the point that it won't be erased by even by the lightest of touches. To prevent this I sprayed a light mist of varnish onto the sheet. DO NOT use varnish from a bottle, that will completely ruin the design.
When the decals are safe to handle it is time to cut them out from the paper. I usually try cut fairly close to the design so the transparent outline around a decal is kept to a minimum. Next the decal gets put in a bath of water. Unlike most decals I've tried, the Testors paper release its captives fairly quickly, just 10-15 seconds with the backing paper in water should be enough.
Before I apply a decal to anything I first prep the surface with some gloss varnish and right before I put the decal in place I also use a chemical called Micro Set. Micro Set does several things, it softens the decal, increases the adhesive qualities and prevents air bubbles. When the decal is in its final position I brush a bit of extra Micro Set on top, wait a few minutes and then press it down with a piece of tissue paper. This is then allowed to set 24 hours before the next stage.
To finish the decal I first brush some gloss varnish on top of it. This is then followed up by several layers of matte varnish concentrated around the edge of the decal. I do this to hide the edge, otherwise it can be visible and quite frankly ruin the look of a model. To be honest, the above picture isn't the best example of how it should look as I didn't wait for the decal to set properly. Who has time to wait 24 hours when doing a tutorial? Not me, that's for certain! Anyway I hope this will help. Enjoy!
Sunday, 28 September 2014
Scratchbuilding tutorial part 3: How to build
And finally we arrive at the third and final part of my little series on scratch building. This will part will deal with the basics of handling, cutting and scribing panel lines on plasticard.

Anyway let's start with making your first part. Here I've used a leftover 1mm plasticard strip that I cut from a larger sheet. Place the ruler where you want to make the cut, take your favourite cutting implement and drag it along the intended line, putting some pressure on the knife. Do NOT cut all the way through!

The picture above shows the resulting cut. Not very much to look at, but it will more than suffice for what comes next.


Next you take the plasticard piece in question and firmly bend close to the cut until it snaps. This is by far the fastest and most efficient way to handle plasticard. On thinner pieces like 0.13 and 0.25mm thick plasticard you can often just cut all the way through with little effort but that will be not sufficient for thicker plasticard. In fact, fact when cutting really thick plasticard you should utilize your scribing tool as well.

Here I have a 2mm thick leftover piece. The procedure is almost the same just with an additional step. First, before using the knife, you make a grove with your scribing tool. Just take the tool and drag it towards you while putting pressure on it. The point on the 'hook' is what does all the work so take care to not damage it.


When you have your groove, just repeat the steps showed earlier. While strictly not necessary, cutting with the knife inside the grove will help with the snapping procedure. In this case I also took the opportunity to make some panel lines on top of the part. Unfortunately they are not very visible in the above pictures but making them couldn't be simpler. Just use the scribing tool as mentioned above but use less pressure than before.


Using a scribing tool without a ruler or some kind of guide is not something I can recommend but sometimes it has to be done. Even worse is any kind of rounded surface or indeed a tube or pipe! For these situations I've developed the following method. First I use some masking tape that I make a couple of layers thick. This forms my 'ruler' and I tape it along the line I wish scribe. Secondly I take a normal knife and score the line. After that I take the scribing tool and slowly push it away from me along the previously scored area. This widens the line and makes it possible to start using the scribing tool as it was intended. It is a slow and fickle process and not always entirely successful but it is certainly better than doing it freehand.

A common problem when cutting plasticard, which is especially pronounced with thicker plasticard, is that the plastic tend to curl upwards and away from the cut. This is understandable as the material has to go somewhere and the path of least resistance is away from the knife. You'll have to excuse my poor drawing skills but the above picture shows a basic view how it looks from the side. This can be very hard to spot before you start painting as white plastic just doesn't produce enough shadows to properly highlight these areas. As a precaution, it is a good idea to always scrape a knife along the edge of any cuts.


Another problem is that the cut is often not as smooth as one would like and yet again it is a problem more pronounced with thicker plasticard. The first picture above shows the end of the 2mm piece I cut earlier and the second one shows an exaggerated profile view. Always be prepared to file and sand every piece you make. Part of this can be alleviated by using a saw but that option isn't always available, especially on a really big pieces.

 When you have your pieces ready it is time to start assembling them. In the above picture I've used the previously cut pieces to form a simple L-shape. These two pieces were simply glued together with plastic cement. Of course, even the fastest curing plastic cement can take some time before the process is finished. This is both a strength and a weakness. A strength in that before it has hardened completely you can still reposition the pieces slightly. However it's a weakness when you just need something you've built to hold up itself very quickly.
In the second situation I usually put a dab of super glue inside the join and spray it with some accelerator. Instant curing and provides pretty good stability as well. Of course, in other situations you need to strengthen the join between pieces and I usually go for some square plasticard. Angles are available and while they are better than squares, you get half the amount compared to squares. On particularly large builds you might need internal structures to hold everything up but I couldn't possibly advice you on what to use, it all depends on the build after all.

When the shape is finished you need to start consider filling and sanding. No matter how well you prepare a piece there will always be a chance that it wasn't perfect. Most commonly this will show along any seams so it's there you need to concentrate your efforts. While I haven't done it in the above picture I would have first filed down or cut away any excess material, and put filler, like Milliput or Green Stuff, along the seam. When cured, this would later be sanded down and filled again if there was a need for it.

Finally I will spend a few words on economical use of plasticard. Whatever you do, don't cut plasticard as can be seen on the left sheet. That leaves strange and unusable shapes and makes it hard to cut more pieces with precision. It is far better to cut long, straight strips and put the leftovers from the strip in your leftover box. The sheet on the right should be proof enough. It started as a full sheet of plasticard that I have cut several strips of differing sizes from until it's about a third left of it. However, unlike the sheet on the left, I will have no problems cutting any additional pieces from it.
And that concludes my tutorial. It is my hope that this will help any beginners to start up their own pieces of art. Until next time!
Anyway let's start with making your first part. Here I've used a leftover 1mm plasticard strip that I cut from a larger sheet. Place the ruler where you want to make the cut, take your favourite cutting implement and drag it along the intended line, putting some pressure on the knife. Do NOT cut all the way through!
The picture above shows the resulting cut. Not very much to look at, but it will more than suffice for what comes next.
Next you take the plasticard piece in question and firmly bend close to the cut until it snaps. This is by far the fastest and most efficient way to handle plasticard. On thinner pieces like 0.13 and 0.25mm thick plasticard you can often just cut all the way through with little effort but that will be not sufficient for thicker plasticard. In fact, fact when cutting really thick plasticard you should utilize your scribing tool as well.
Here I have a 2mm thick leftover piece. The procedure is almost the same just with an additional step. First, before using the knife, you make a grove with your scribing tool. Just take the tool and drag it towards you while putting pressure on it. The point on the 'hook' is what does all the work so take care to not damage it.
When you have your groove, just repeat the steps showed earlier. While strictly not necessary, cutting with the knife inside the grove will help with the snapping procedure. In this case I also took the opportunity to make some panel lines on top of the part. Unfortunately they are not very visible in the above pictures but making them couldn't be simpler. Just use the scribing tool as mentioned above but use less pressure than before.
Using a scribing tool without a ruler or some kind of guide is not something I can recommend but sometimes it has to be done. Even worse is any kind of rounded surface or indeed a tube or pipe! For these situations I've developed the following method. First I use some masking tape that I make a couple of layers thick. This forms my 'ruler' and I tape it along the line I wish scribe. Secondly I take a normal knife and score the line. After that I take the scribing tool and slowly push it away from me along the previously scored area. This widens the line and makes it possible to start using the scribing tool as it was intended. It is a slow and fickle process and not always entirely successful but it is certainly better than doing it freehand.
A common problem when cutting plasticard, which is especially pronounced with thicker plasticard, is that the plastic tend to curl upwards and away from the cut. This is understandable as the material has to go somewhere and the path of least resistance is away from the knife. You'll have to excuse my poor drawing skills but the above picture shows a basic view how it looks from the side. This can be very hard to spot before you start painting as white plastic just doesn't produce enough shadows to properly highlight these areas. As a precaution, it is a good idea to always scrape a knife along the edge of any cuts.
Another problem is that the cut is often not as smooth as one would like and yet again it is a problem more pronounced with thicker plasticard. The first picture above shows the end of the 2mm piece I cut earlier and the second one shows an exaggerated profile view. Always be prepared to file and sand every piece you make. Part of this can be alleviated by using a saw but that option isn't always available, especially on a really big pieces.
In the second situation I usually put a dab of super glue inside the join and spray it with some accelerator. Instant curing and provides pretty good stability as well. Of course, in other situations you need to strengthen the join between pieces and I usually go for some square plasticard. Angles are available and while they are better than squares, you get half the amount compared to squares. On particularly large builds you might need internal structures to hold everything up but I couldn't possibly advice you on what to use, it all depends on the build after all.
When the shape is finished you need to start consider filling and sanding. No matter how well you prepare a piece there will always be a chance that it wasn't perfect. Most commonly this will show along any seams so it's there you need to concentrate your efforts. While I haven't done it in the above picture I would have first filed down or cut away any excess material, and put filler, like Milliput or Green Stuff, along the seam. When cured, this would later be sanded down and filled again if there was a need for it.
Finally I will spend a few words on economical use of plasticard. Whatever you do, don't cut plasticard as can be seen on the left sheet. That leaves strange and unusable shapes and makes it hard to cut more pieces with precision. It is far better to cut long, straight strips and put the leftovers from the strip in your leftover box. The sheet on the right should be proof enough. It started as a full sheet of plasticard that I have cut several strips of differing sizes from until it's about a third left of it. However, unlike the sheet on the left, I will have no problems cutting any additional pieces from it.
And that concludes my tutorial. It is my hope that this will help any beginners to start up their own pieces of art. Until next time!
Thursday, 18 September 2014
Scratchbuilding tutorial part 2: Chemicals and material
And here is the second part of my beginner tutorial on scratchbuilding. This will mostly deal with the types of glue, modelling clays/fillers and materials that I use when creating my models.


- Super glue - Cyanoacrylate or super glue as it is more commonly known is a must. I can't recommend using it for an entire build but it is very good for strengthening the bond of something you've first glued with plastic cement. Medium viscosity super glue is the most common and is probably the easiest to use.
- Super glue accelerator - While super glue hardens quickly if used correctly, sometimes that just isn't fast enough or the parts to be glued do not get a good grip on each other. This is where the accelerator comes in. Even a small burst of accelerator will speed up the curing process considerably to the point that it almost feel instantaneous. However, accelerator fluid is rather unhealthy, particularly the vapours, so use it with caution.
- Milliput and liquid Green Stuff - For sculpting, filling holes and removing small marks and imperfections I use a combination of standard Milliput, superfine Milliput and liquid Green Stuff. Milliput is a two-part epoxy putty similar to Green Stuff that comes in many varieties. I use the standard Milliput for sculpting and large scale filler/repair while the superfine version is mostly used as filler. The best part of Milliput is that it doesn't shrink, which cannot be said of liquid Green Stuff. GWs contribution is still useful but only as a second stage filler when the imperfections has become so small that the shrinking isn't much of a problem.
- Epoxy glue - I do not often use Epoxy glue but it's very good to have around for the few situations that I really need it for.
- Magnets - Neodymium magnets are all the rage amongst modellers nowadays and with good reason. While strictly not necessary to complete a scratchbuild, they do present a number of additional options for a builder that wants to go the extra mile. I myself have used them to good effect in a number of builds, making arms and weapons changeable.
- Piano wire - Stiff wire of some sort is very useful for pinning parts into place. It doesn't have to be piano wire specifically but it is easy to find and readily available on most good hobby stores. I use 1mm and 0.5mm piano wire for all kinds of projects as the extra strength it lends parts is often invaluable.
- Plasticard - Yes, you are going to need plasticard, that much should be obvious. I couldn't possibly tell you what you need, that all depends on what you are building. I will however say that I find 0.75mm plasticard perhaps the most versatile as it is thick enough to hold up well in most situations, yet thin enough to cut and sand down fairly easily. 0.25mm on the other hand is what I mostly use for decoration. Evergreen Scale Models make most of the plasticard I have but there are several manufacturers and makes so it can really pay off to have a look around.
- Leftover box - It is nigh impossible to use a sheet of plasticard completely. You will be stuck with a fair amount of leftovers and sometimes failed components, no matter what you do. However do no throw away this, it is a valuable treasure for future builds so keep it in a box where you can easily search through it.
- Bits - There is one truth above all others when building miniatures for wargames and that is to never throw away anything! The lack of a well stocked bits box can make or break an entire build. The one shown above is really just one of several I have collected over the years and will likely just become more in the future.
Saturday, 13 September 2014
Scrathbuilding tutorial part 1: Tools of the trade
So I've gotten it into my head that I should do a few articles on how to scratchbuild. Not perhaps the most in-depth series but it should be more than enough to give any beginners a decent boost. Here is the first part, the tools needed to actually build.


- Knives - You are going to need knives. I personally use cheap snap-off blade knifes and scalpels but I know there are LOTS of alternatives and it very much comes down to personal preference. In any case, this is not optional and any hobbyist worth anything should already have a collection of favourite cutting implements.
- Scribing tool - While perhaps slightly in the optional category, a good scribing tool will save you a lot of headaches, not to mention let you keep what little sanity you might have left. The one I'm using is from Tamiya but there are others that are equally useful.
- Files and abrasives - This is also very much needed and also very much up to the preference of the user. I have several needle files that comes in several different sizes, shapes and grits as well as some sanding blocks and sanding paper. I've also found that the multi-grit sanding sticks normally used for polishing nails are very good.
- Side cutters - I use two side cutters, one that is rather heavy duty and can easily cut piano wire and another that is often called a sprue cutter as it is flat on one side and can really get close to the part getting cut loose.
- Cutting mat - A self healing cutting mat is perhaps not necessary but it will save your worktable a lot of wear and tear.
- Pin vise and drills - This an absolute must! If you don't have a pin vise already go buy one, now! An assortment of drills in different sizes are also very helpful. I have two sets of drills, one which starts at 0.3mm with 0.05mm increments up to 1.6mm and another that goes from 1.5mm to 6.5mm.
- Razor saw - While almost any small saw will do, the fine teeth and thin blade of a razor saw is ideal for this kind of work.
- Plier - Highly optional but sometimes you just need that extra bit of leverage and any kind of pliers will give you that. Just make sure that the inside of the jaws are smooth so you don't end up with ugly marks on the plasticard.
- Measuring tools - A good steel ruler is the bare minimum of what you need. I also use a smaller aluminium ruler (though to be fair it is kind of crappy), a calliper and an angle ruler. The smaller a build is, the higher the precision needs to be.
- Profile tool - Highly optional but there have been situations where I truly wished I would have had one close at hand.
- Pipe cutter - Strangely enough not very useful for cutting plasticard tubes, but it is good for creating panel lines on a perfectly round surface. Still, not something that is used terribly often.
- Hammer and hole punch set - In the words of Jeremy Clarkson of Top Gear, 'Right, where's my hammers?' Seriously though, a hammer should only be used in conjunction with a hole punch set (or to demolish a particularly horrible failure). A compass/circle cutter might be a better choice.
- Toothpicks - Yes, toothpicks. Seriously, don't knock it until you try it. Toothpicks can be used as tools, building material, glue and paint applier, mixing sticks and any number of applications. Don't enter your hobby room without them.
- Mitre box - Optional but extremely useful. It's gotta be fairly small as a standard mitre box is just bloody gigantic for this kind of work.
- Power tools - The manliest part of your arsenal! A battery powered drill will help immensely when doing large scale drilling. Most pin vises can't even fit the larger drill bits so you kind of have to use a power drill for some situations. I also have a Dremel(TM) type rotary tool that can be used for all kinds of things, though to be fair it isn't always the best choice for plasticard. The high speed of a rotary tool has a tendency to melt the plastic rather than cut or grind it.
Subscribe to:
Posts (Atom)